Wednesday, 12 May 2010

Hyakuretsu Kyaku (Fast Kicks)

I've dived right into the animation of the Hyakuretsu Kyaku (the fast kicks).

Reference


I used the action editor to create an action by key-framing the bones at different positions. This action then could be re-used at any point in the NLA editor where it can easily be scaled, repeated or moved in the timeline. In this case I just needed to repeat the action several times. It's going pretty well so far and I have the basic animation looking ok.

The legs move extremely quickly but this is how they are supposed to look when referring to the original footage.

I then tweaked the animation just to get that extra level of realism. One way of doing this is to animate slight offsets with lots of bones so this is what I have tried to do.


Tuesday, 11 May 2010

Rigging and weight painting....again

After having tweaked the mesh I've got round to rigging and weight painting again. The armature was exactly the same as last time with extra bones for the front and back of Chun li's dress.

I am now discovering how important the weight painting process is to the quality of the final animation. I was able to weight paint the legs easier this time as I found out that if you hide vertices in edit mode, although they re-appear in object and weight paint mode, they cannot be painted over. In addition to this I painted the cloth parts of Chun li's dress first this time so I could move them out of the way and paint underneath more effectively. This made a huge difference.

As well as this I have used weights of 0.5 (green) on some of the joints so that both bones influence the mesh.


I also took away the weight painting of the hip bones and painted the legs right up to the waist. This was in an attempt to remove crimping I was getting at the top of the leg.


Even with these precautions I am finding it incredibly difficult to eradicate crimping and poor mesh deformation in the legs and particularly the groin area. I believe this is because of the size of her legs and thighs.


After working on the weight paints for some time I have tried posing my character again in her most extreme position she will have to take.

It's not looking too bad, most of the crimping can be hidden and as this is as far as she will have to stretch I may settle for these weights.

Monday, 10 May 2010

One step forward, two steps back... (re-visiting the mesh)

Eventually I decided I was not satisfied with the mesh and so I have gone back to before the rigging to tweak it.

After moving the mesh about when it was rigged it gives you a good idea of parts that don't look right and that could do with some extra work. In this case the main area I have worked on is the legs. Chun li is renowned for having large legs and my character did not reflect this. In addition to this I have tweaked various other parts of the mesh such as the shoulders and the stomach area.

Before

After

The most difficult part of this stage was increasing the size of Chun li's legs and thighs without simply making the character look overweight. It took a long time to try and get this balance right.

Overall the character could still be improved but I am now more happy with the appearance than before and am going to rig her and try out some poses again with the improved mesh.

Sunday, 9 May 2010

Rigging and Weight Painting

After deciding to leave the mesh how it is, I have moved on to rigging and weight painting it.


The armature is not too complicated but it should allow for a lot of control over the mesh. There are constraints added to the legs so that they cannot bend in on themselves and there is also a master bone and and eye tracker for future animations. There are also bones added to the cloth that hangs in front and behind the characters legs so these features can also be animated.


The weight painting of the character proved to be very tricky, especially in the leg area as I had to try and paint under clothes and generally parts that were very difficult to get to. Particularly the upper legs.

After weight painting the character I attempted to place her in some poses to test out the armature etc... On doing this I realise how difficult it is going to be to animate her effectively. There are certain problem areas that maybe are not weight painted accurately enough where folds in the skin can be seen and it does not look attractive.
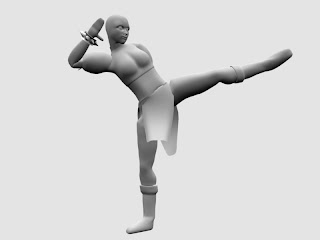
At the top of the legs it really shows that her legs fold in where they shouldn't. It has also become obvious that the thighs and legs of my character could have done with being a bit larger to replicate chun li better but changing this now may have adverse effects.

From here I am not sure what the next step is. The choice I have is to edit the mesh further to make it look better, to try and improve the weight painting so that the mesh deforms better or to dive straight in to the animations.

I would love to spend more time on the model and weight painting but at this stage I might have to get on with the animating.


Modelling clothes...

I have modelled the clothes on my character and I think they are looking quite good considering they aren't textured.


The main techniques used where extruding from the body to create the shapes necessary and then spending a lot of time tweaking the various parts until they were of a satisfactory standard.


The wrist bands are seperate objects created from a crircle being extruded and then having cones added.

Saturday, 8 May 2010

What's next...

Now that the head is complete and the basic body is there, the next step is going to be adding Chun Li's clothes to the mesh. This will be achieved by editing the mesh itself in edit mode to add items such as the boots and generally adding detail where clothes meet the skin. I wont't attempt to add the clothes with as much detail as they could have but hopefully just enough so it is clear who the character is.

Here is a screenshot displaying the clothes I will be trying to replicate:
With more time I would love to texture the character as well but for this project, I will leave the whole model the default grey as there is not sufficient time.


Modelling the head finished

I have finally finished the last part of the female head tutorial. The last part was the hardest as the tutorial was basically an hour of tweaking and was really time consuming. A lot more sculpt mode was used and also detail was added in particular to the lips and eyes.

Here is a screenshot of what I ended up with.


I would really love more time to tweak the head, for example I think the lips could use a bit more work. In addition to this it would be great to add hair and ears to the mesh, however I need to move on at this stage.