Overall I am pleased with how the final sequence turned out although there are some aspects of it that could certainly be improved.
The mesh looks detailed although lacking colour. The head that took so long to build fits well with the body but could have used some close up shots to show it off a bit more. The biggest challenge when modelling the head were the subtle tweaks and the use of Blenders sculpt tool as there were no strict guidelines here but I was pleased with the results. The late changes that were made to the legs were also well worth it as they suit the mesh far more although when animating it became clear that the thighs on my character were still not as large as those in the game. The hands could also have done with having some fingers rather than just a glove but this was not too important as there was not that much use of hands in any of the animations.
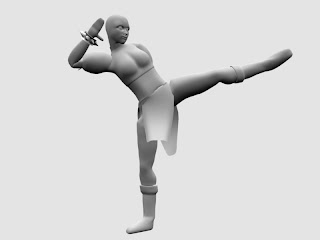
The hyakuretsu kyaku (fast kicks) animation went quite smoothly and resembled well the move from the game without the special effects. With the left leg stretched so high there were some crimping issues under the legs, however they could easily be hidden by the cloth that hangs down the front of Chun li. Aside from this the main difficulty was creating movement in the the torso so it was not static as the legs kicked. This was achieved with some small movements animated at offsets and some spine rotation.
The walkcycle animation flows nicely because of the subtle weighting in the torso and legs. The references and guidance used were really helpful for this. However, there is a slight clipping issue with the hands going through the cloth as they move behind the back. Issues such as this can even be seen in the Street Fighter game though and can be difficult to get rid of without making the movements seem too unnatural. There were no real crimping issues in the walkcycle as none of the bones are particularly stretched during this sequence.
The spinning bird kick animation was the most difficult of the three to animate well. The reason for this was partly that the main sequence is just the character flipped with rotations. To make it more interesting I added some body animations during the cycle but they are quite difficult to see. The trouble area sequence was the transition into and out of the move. It would have been difficult to key-frame this part in the action as the repeat function could no longer be used as Chun li would land and take off for every repeat. Instead, the blending function of the NLA editor was used, I adjusted it as best I could but the transition still looks quite rough. I also sped up the animation to match more closely the game which also helped hide the transitions.
Finally there are the stretch, bow and stance sequences. These actions all look decent but are not particularly long. The offset movements were used to make look more realistic and this worked well. These sequences were used mainly as transitional periods between the main three animations but could also be included as part of them.
There are plenty of ways the animations could be expanded on. Regarding the model, primarily the head could be completed with ears and Chun li's distinctive hair style and the whole body could then be textured with UV mapping to complete the character. Following this the hands could be given fingers so they could be animated separately. In terms of the animations the weight paining could be improved to reduce the crimping at some of the joints. Following this it would be nice to animate the rest of Chun Li's special moves from the street fighter games and just smooth out the existing animations, particularly the transition in and out of the spinning bird kick.
Friday, 14 May 2010
Thursday, 13 May 2010
Final Sequence
I have tweaked the animations as much as I can to get them looking as smooth as possible. In particular I sped up the spinning bird kick sequence to more closely match the game. This also helped to hide the rough transition in and out of the kick.
In addition to this I have moved the camera position so that Chun li falls along one of the thirds of the screen, adhering to the rule of thirds technique that should allow my character to draw more attention.
The scale of the whole scene was also so large that at some points during the sequence the far side of Chun li's legs were disappearing so I scaled everything down including the energy of the lights. This darkened the greyscale of Chun li to a more bold grey that works better.
(Youtube link as Blogger won't let me upload the video)
Spinning Bird Kick
The final action I am animating is the spinning bird kick.
Reference
This is proving to be really quite difficult. The problem is that there is so much rotation and transformation going into the kick that blending into this action is tricky and can look quite out of place. Unfortunately it would be very difficult to key-frame this transition myself as when repeating the action in the NLA editor the transition would also be repeated which is not what I want.
Another problem is Blender's rotation system. When rotating over 180 degrees, Blender will automatically take the shortest route, this becomes a problem when you want constant rotation above 180. To correct this I have rotated 2 times at 179 degrees instead of 180 and then repeated the action, this way Chun li still rotates through all 360.
In addition to this animations tend to slow down near the keyframes and when animating constant rotation this is not necessarily desired. To correct this I have used the IPO curve editor and selected Linear interpolation for the keyframes in this action.
I have placed the spinning bird kick in my sequence and used another stance and bow actions to complete it. From here I just need to fine tune the animation as best I can to get everything looking smoother and more natural.
Animating continued...
I have created two more actions which are a bow such as before a martial arts fight and a fighting stance. The fighting stance is an attempt to replicate Chun li's stance from the street fighter games and can be seen in all the reference videos with game footage.
Reference (Had to use youtube as Blogger was not working)
I also decided to change the order of the current actions. This was simple, as I have animated all the actions separately they can be scaled moved and repeated easily in the NLA editor. To get the poses to flow more I animate the bones at offsets. This often makes the whole animations look more natural. This can be seen particularly in the fighting stance.
Wednesday, 12 May 2010
Animating continued...
Fine tuning the animations that I currently have and have also created a stretching animation which I have currently placed between the two. The stretching animation is also an action from Chun li in the street fighter games and this was used as a reference for the timing.
Reference
Originally I incorporated the slight vibration at the end of the stretch, however it did not really suit my mesh so I removed it.
Reference
Originally I incorporated the slight vibration at the end of the stretch, however it did not really suit my mesh so I removed it.
Walkcycle
Decided to animated a walkcycle instead of the Hazanshu (flip) special move of Chun li. The Hazanshu would not have lasted as long as this animation and as I am already animating two of her special moves it would be more interesting to animate something different. In addition to this there is a lot of guidance available for animating walkcycles.
Reference
When starting this animation I realised a problem, pasting flipped poses was not working properly, some bones was not responding as they should. I found out that the reason for this was the 'roll' value for bones in my armature. While this value should have been at 0 for all bones, it was not so I adjusted these values. Unfortunately this moved all the bones out of place for the kicking animation I had already created as well as the walkcycle I started so I had to start over in this respect. However the second time I was able to improve the animations and complete them faster as I knew roughly where to place bones.
Used reference points and guidance from http://www.rubberbug.com/walking.htm as well as the official blender tutorial at http://wiki.blender.org/index.php/Doc:Tutorials/Animation/BSoD/Character_Animation to animate a smooth and natural looking walkcycle.
After completing these 2 animations I used the auto blend options in the NLA editor to put them together.
Hyakuretsu Kyaku (Fast Kicks)
I've dived right into the animation of the Hyakuretsu Kyaku (the fast kicks).
Reference
I used the action editor to create an action by key-framing the bones at different positions. This action then could be re-used at any point in the NLA editor where it can easily be scaled, repeated or moved in the timeline. In this case I just needed to repeat the action several times. It's going pretty well so far and I have the basic animation looking ok.
The legs move extremely quickly but this is how they are supposed to look when referring to the original footage.
I then tweaked the animation just to get that extra level of realism. One way of doing this is to animate slight offsets with lots of bones so this is what I have tried to do.
Tuesday, 11 May 2010
Rigging and weight painting....again
After having tweaked the mesh I've got round to rigging and weight painting again. The armature was exactly the same as last time with extra bones for the front and back of Chun li's dress.

As well as this I have used weights of 0.5 (green) on some of the joints so that both bones influence the mesh.
I also took away the weight painting of the hip bones and painted the legs right up to the waist. This was in an attempt to remove crimping I was getting at the top of the leg.
Even with these precautions I am finding it incredibly difficult to eradicate crimping and poor mesh deformation in the legs and particularly the groin area. I believe this is because of the size of her legs and thighs.
After working on the weight paints for some time I have tried posing my character again in her most extreme position she will have to take.
 It's not looking too bad, most of the crimping can be hidden and as this is as far as she will have to stretch I may settle for these weights.
I am now discovering how important the weight painting process is to the quality of the final animation. I was able to weight paint the legs easier this time as I found out that if you hide vertices in edit mode, although they re-appear in object and weight paint mode, they cannot be painted over. In addition to this I painted the cloth parts of Chun li's dress first this time so I could move them out of the way and paint underneath more effectively. This made a huge difference.

As well as this I have used weights of 0.5 (green) on some of the joints so that both bones influence the mesh.
I also took away the weight painting of the hip bones and painted the legs right up to the waist. This was in an attempt to remove crimping I was getting at the top of the leg.
Even with these precautions I am finding it incredibly difficult to eradicate crimping and poor mesh deformation in the legs and particularly the groin area. I believe this is because of the size of her legs and thighs.
After working on the weight paints for some time I have tried posing my character again in her most extreme position she will have to take.
It's not looking too bad, most of the crimping can be hidden and as this is as far as she will have to stretch I may settle for these weights.
Monday, 10 May 2010
One step forward, two steps back... (re-visiting the mesh)
Eventually I decided I was not satisfied with the mesh and so I have gone back to before the rigging to tweak it.
After moving the mesh about when it was rigged it gives you a good idea of parts that don't look right and that could do with some extra work. In this case the main area I have worked on is the legs. Chun li is renowned for having large legs and my character did not reflect this. In addition to this I have tweaked various other parts of the mesh such as the shoulders and the stomach area.


After moving the mesh about when it was rigged it gives you a good idea of parts that don't look right and that could do with some extra work. In this case the main area I have worked on is the legs. Chun li is renowned for having large legs and my character did not reflect this. In addition to this I have tweaked various other parts of the mesh such as the shoulders and the stomach area.
Before
After
The most difficult part of this stage was increasing the size of Chun li's legs and thighs without simply making the character look overweight. It took a long time to try and get this balance right.
Overall the character could still be improved but I am now more happy with the appearance than before and am going to rig her and try out some poses again with the improved mesh.
Sunday, 9 May 2010
Rigging and Weight Painting
After deciding to leave the mesh how it is, I have moved on to rigging and weight painting it.
The armature is not too complicated but it should allow for a lot of control over the mesh. There are constraints added to the legs so that they cannot bend in on themselves and there is also a master bone and and eye tracker for future animations. There are also bones added to the cloth that hangs in front and behind the characters legs so these features can also be animated.
The armature is not too complicated but it should allow for a lot of control over the mesh. There are constraints added to the legs so that they cannot bend in on themselves and there is also a master bone and and eye tracker for future animations. There are also bones added to the cloth that hangs in front and behind the characters legs so these features can also be animated.
 The weight painting of the character proved to be very tricky, especially in the leg area as I had to try and paint under clothes and generally parts that were very difficult to get to. Particularly the upper legs.
After weight painting the character I attempted to place her in some poses to test out the armature etc... On doing this I realise how difficult it is going to be to animate her effectively. There are certain problem areas that maybe are not weight painted accurately enough where folds in the skin can be seen and it does not look attractive.
 At the top of the legs it really shows that her legs fold in where they shouldn't. It has also become obvious that the thighs and legs of my character could have done with being a bit larger to replicate chun li better but changing this now may have adverse effects.
From here I am not sure what the next step is. The choice I have is to edit the mesh further to make it look better, to try and improve the weight painting so that the mesh deforms better or to dive straight in to the animations.
I would love to spend more time on the model and weight painting but at this stage I might have to get on with the animating.
Modelling clothes...
I have modelled the clothes on my character and I think they are looking quite good considering they aren't textured.

The main techniques used where extruding from the body to create the shapes necessary and then spending a lot of time tweaking the various parts until they were of a satisfactory standard.
The wrist bands are seperate objects created from a crircle being extruded and then having cones added.
The main techniques used where extruding from the body to create the shapes necessary and then spending a lot of time tweaking the various parts until they were of a satisfactory standard.
The wrist bands are seperate objects created from a crircle being extruded and then having cones added.
Saturday, 8 May 2010
What's next...
Now that the head is complete and the basic body is there, the next step is going to be adding Chun Li's clothes to the mesh. This will be achieved by editing the mesh itself in edit mode to add items such as the boots and generally adding detail where clothes meet the skin. I wont't attempt to add the clothes with as much detail as they could have but hopefully just enough so it is clear who the character is.
 With more time I would love to texture the character as well but for this project, I will leave the whole model the default grey as there is not sufficient time.
Here is a screenshot displaying the clothes I will be trying to replicate:
With more time I would love to texture the character as well but for this project, I will leave the whole model the default grey as there is not sufficient time.Modelling the head finished
I have finally finished the last part of the female head tutorial. The last part was the hardest as the tutorial was basically an hour of tweaking and was really time consuming. A lot more sculpt mode was used and also detail was added in particular to the lips and eyes.
Here is a screenshot of what I ended up with.


Here is a screenshot of what I ended up with.
I would really love more time to tweak the head, for example I think the lips could use a bit more work. In addition to this it would be great to add hair and ears to the mesh, however I need to move on at this stage.
Subscribe to:
Posts (Atom)